 data security
Recent revelations about government surveillance have once more brought two-decade old PGP software into the spotlight, as it remains a robust and secure mechanism for communications. However, progress in the computing industry requires using longer keys to make attacks on key pairs less possible. Therefore, my objective is to provide you with the information necessary to create a new RSA key pair with a length of more than 4,096 bits. The longer the lifetime of your data the longer your key should be. However, nothing is free, and each time you double your key length the decryption becomes 6 or 7 times slower. Therefore, we’ve chosen a key length of 8,192 bits for this article.

Not many tools that are currently available support this key size by default, so in order to create our new key we are going to download and modify the latest GnuPG version (currently 1.4.15). We’ll use Ubuntu Linux for this example since nowadays it’s a pretty popular distribution and it will allow you to follow these steps in a simple and straightforward manner. As an alternative, you could also use Cygwin, which is a good way to have a basic Linux-like environment in your Windows OS.
Once you have created your key with the following guide, you can use one of the many tools available for your chosen OS to manage it. For example in Mac OSX you have GPG Suite and in Windows you can download GP4Win, both allow key generation, key management and all the basic operations you will usually perform everyday with PGP.
On the one hand you have Gpg4win (GNU Privacy Guard for Windows), which is maintained by the developers of GnuPG and provides encryption and digital signing software for files and emails protecting your valuable information and communications. It’s free software and highly recommended for all Windows users.
On the other hand, if you have GPG Suite for Mac OSX, which integrates nicely with your OS, providing an open source plugin for Apple Mail and enabling you to encrypt and sign your messages easily. There is also an application to manage your keychain and a command line version of GPG to further explore all the alternatives this tool has to offer.

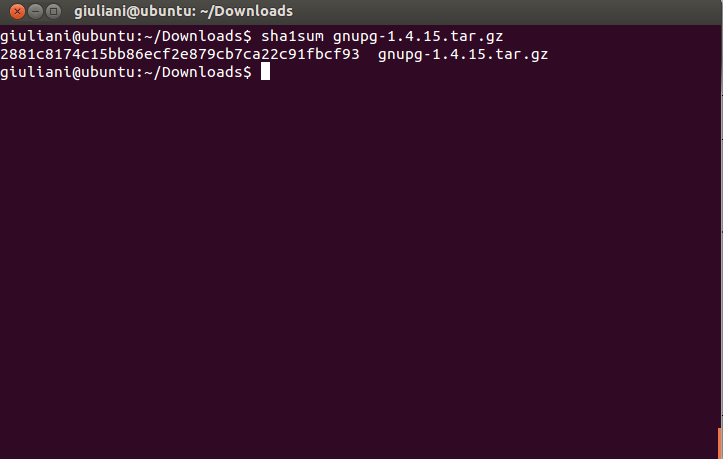
We’ll start by getting the GnuPG sources and decompressing them into a folder in our hard disk. It’s recommended first that we verify the SHA1 signature for this file to check that everything is correct and we’ve downloaded the verified version of the software. For that, we can use the already installed utility “sha1sum” and if the calculated hash matches the one available on the GnuPG website, we are good to go.
For this guide we are going to modify a couple source files, but I promise it’s not too complex and the rewards will be enough to justify this effort.
I’m going to download the gzip compressed GnuPG 1.4.15 source file and with the help of the “tar xvzf [filename]” command, I will obtain a decompressed folder with the original contents of the file. You have to replace the [filename] part of the command with the actual name of the downloaded archive. No square brackets are needed in the actual command.

Next, we need to browse the recently extracted directory by doing a “cd [gnupg-folder]”. There we will find the contents we need for building our GnuPG binary. The first step involves modifying the “keygen.c” file located in the “g10 directory”.

You can edit the “keygen.c” file using “gedit”, for example, and when shown the contents you can search for the string “4096”, which is the current maximum key size that GnuPG has set up by default. We’ll change that value to “8192” for our purposes in line 1572. Don’t forget to save your changes. Make sure you haven’t introduced any other changes!

After we have made this simple modification we are ready to compile our new version of GnuPG. For that the usual “./configure” and “make” commands should be enough. Moreover, if we want to replace the GPG version that Ubuntu ships with by default we’ll execute a “sudo make install”. For the moment we’ll use our newly created binary locally in order to set up our RSA 8192 bits key pair.

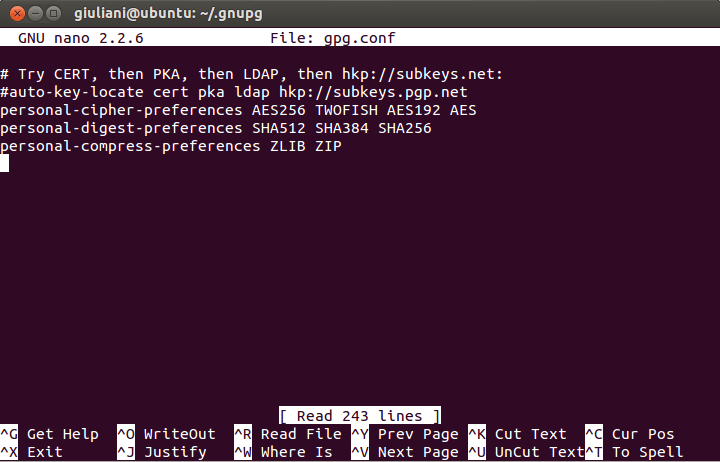
Before executing “gpg” we’ll modify the gpg.conf file located in your Home directory, in this case “/home/Giuliani/.gnupg/gpg.conf”. By default it won’t have any content but we’ll add our choice of preference for cipher, digest and compression algorithms and hashing mechanisms.
For this particular case I’m going to add at the end of the file the following contents (you can of course change this to your preferences/needs):
personal-cipher-preferences AES256 TWOFISH AES192 AES
personal-digest-preferences SHA512 SHA384 SHA256
personal-compress-preferences ZLIB ZIP
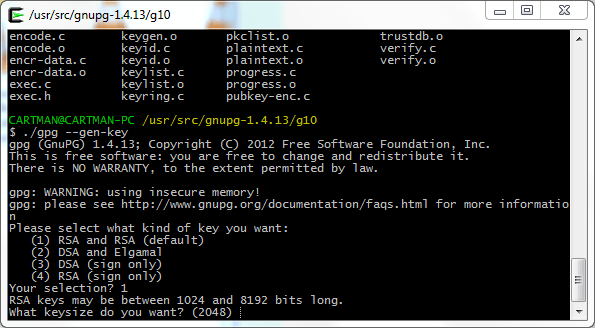
After all this hard work we are finally ready to create our key, we’ll execute the “./gpg –gen-key” command from the “g10” directory (where we previously modified the “keygen.c” file”) and will follow the instructions on the screen. The process is pretty simple, we choose the first option to create a key pair that will be used for signing and encrypting and we’ll select 8192 bits as the key size.

Just to add a little more realism to the example, I’m going to set the expiration date for this key too. We’ll use “5y” to tell “gpg” that this key will expire in 5 years.

Then we add the name, email address and comment (optional) for this identity. We can add more identities later so don’t worry if you have multiple email addresses you want to include in this key pair.

You will then be prompted to enter your password or passphrase (depending on your personal preferences you should choose one here). There are some good guidelines on choosing a good passphrase that will keep your key secure and also will simplify the task of remembering it. If you want more information you can review some FAQs available online.
Remember that if you want to change your password/passphrase later you can do so without the need to recreate your key or distribute the public one to your contacts again.
After all the information is entered the process of creating the key pair will begin, GPG will start collecting random bytes in order to improve the random number generation process. Keep using your PC until this process finishes (it can take a while depending on the computer you are using, in my I5 PC with 8 gigs of RAM it took about 15 minutes to complete).

Finally, the key creation process is finished. GPG will show the fingerprint for the key, expiration date and all the information you entered previously. Make sure everything is correct before distributing the public key to your contacts.

You can use the GPG “list” command (–list-keys) to check all the available keys in your system and export the ones you need. We are going to export the public key for our recently created identity “Joe Doe” the result will be the key file which you can later upload manually to one of the available PGP key servers or distribute it directly to your contacts. The easiest way to do this is by typing “gpg –export –a [username] > [public-key-filename]”.

If you want to upload your public key from the command line you can do so by using the “gpg –keyserver [serverurl] –send-keys [keyID]” command.

You can also import public keys using the “—recv-keys” switch instead. All within the comfort of your own command line interface.
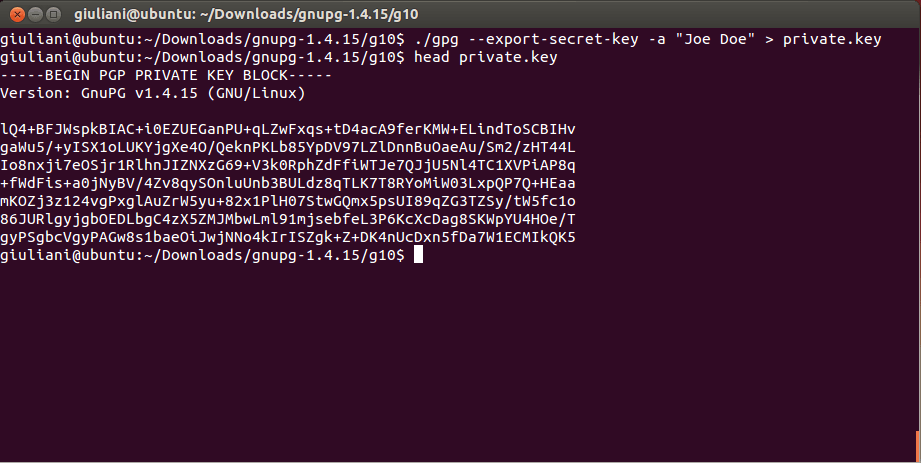
Finally, we are going to create a backup of our private key. Be very careful with this and remember not to share this file with anyone. The process is very similar to what we have seen previously and we can back up our key using “gpg export-secret-key –a [username] > [private-key-filename]”
Now you have your brand new PGP key pair, which you can use to enjoy a whole new world of secure communications and data privacy. Welcome!
Having taken our first step with PGP I hope that you will come back to check in on further updates about this topic. In the meantime, you can play around with one of the many GPG Cheat sheets available, which will enable you to adjust the encryption/decryption functionality, file and message signing and much more.
